|
|
|
|
|
|
|
|
Empress Technical News - Jan 2010 Database Encryption - Safeguarding Confidential Data in Microsoft Windows Environments Database with Encryption Using Microsoft CryptoAPI
IntroductionEmpress Database with Encryption in the September 2008 Technical News was used to show what happens when using an index and a where clause on encrypted data. The objective was to show that Empress Database with Encryption does two things. First, it can index encrypted data and select it. Second, it can select encrypted data from a table based on a where clause. All this can be done without any need to modify the SQL commands that are used for non-encrypted data.
In that example, the Linux system was Ubuntu Linux and the encryption algorithms are part of the libgcrypt library. This libgcrypt library is a standard part of most 2.6 Linux systems such as Red Hat Enterprise Linux, Novell Linux, Ubuntu, etc. and implements encryption algorithms such as AES (Advanced Encryption Standard) using key sizes of 128, 192 or 256 bits.
In Microsoft Windows environments it is also possible to use the libgcrypt library. However, it is far more appropriate to use native Microsoft cryptographic abilities. Microsoft cryptographic technologies include CryptoAPI, CryptoAPI Tools, Cryptographic Service Providers (CSP) and others. Empress has interfaced CryptoAPI calls in order to encrypt/decrypt data at rest in its database.
Preparing the Encryption Environment and DatabaseLog onto a Microsoft Windows system that has an Empress Database with encryption option installed. We will use Visual Studio 2005 Command Prompt for this demonstration of Empress capabilities. Other shell based environments could also be used such as Windows PowerShell or Cygwin Bash Shell to accomplish similar tasks.
Change folder to \tmp to use this space for demonstration:
$ C: $ cd \tmp Use the Empress variable MSCIPHERKEYINFO to associate the new database name testdb with a short hexadecimal encryption key 74657374696e6731. You can choose the most appropriate database name and encryption key.
$ set MSCIPHERKEYINFO=" C:\tmp\testdb:74657374696e6731
$ echo %MSCIPHERKEYINFO% C:/tmp/testdb:74657374696e6731
Now create the database testdb in \tmp using the empmkdb command with the cipher option set to MS-AES256. Encryption and decryption on this database will be performed using the Advanced Encryption Standard (AES) algorithm with a key size of 256 bits (32 bytes or 64 hexadecimal digits) through the Microsoft Cryptographic Service provider. For illustrative purposes only, we use a shorter and less secure key of 16 hex digits.
$ empmkdb -cipher MS-AES256 testdb There are other ciphers that potentially could be utilized.
The following empadm -help
utility shows available ciphers in the Microsoft Windows environment:
Start the Database and Create Two Tables, Hello1 & Hello2Start up Empress Interactive SQL using the empsql command on the database testdb. The Interactive SQL prompt should appear.
$ empsql testdb EMPRESS V10.20 (c) Copyright Empress Software Inc. 1983, 2010 1*
Create two new tables called Hello1 and Hello2 with two fields called Name and Message. Name will store 10 characters and Message will store 15 characters. The Message field in Hello2 is also specified as encrypted.
1* create table Hello1 (Name character (10), Message character (15)) 2* create table Hello2 (Name character (10), Message character (15) encrypted)
Store Values & Create Index on Two Tables, Hello2 EncryptedStore three values for Name and Message into the Hello1 and Hello2 tables using the insert command. Use Alex, Tom and Sam for Name and Hello World, Good Day and Welcome for Message.
3* insert into Hello1 values (" Alex" , " Hello World" ) 4* insert into Hello1 values (" Tom" , " Good Day" ) 5* insert into Hello1 values (" Sam" , " Welcome" )
6* insert into Hello2 values (" Alex" , " Hello World" ) 7* insert into Hello2 values (" Tom" , " Good Day" ) 8* insert into Hello2 values (" Sam" , " Welcome" )
Create an index on Messages in both tables Hello1 and Hello2.
9* create unique index Hello1x on Hello1( Message ) 10* create unique index Hello2x on Hello2( Message )
Select ALL Data from Two Tables, Hello2 EncryptedSelect all the data from the Hello1 and Hello2 tables. The Name Alex, and the Message Hello World followed by Sam and Welcome is printed on the terminal. The Messages in Hello2 are the same as in Hello1 even though Hello2 Messages are encrypted at the file level.
11* select * from Hello1 Name Message
Alex Hello World Tom Good Day Sam Welcome
12* select * from Hello2 Name Message
Alex Hello World Tom Good Day Sam Welcome Select Using a Where Clause from Two Tables, Hello2 EncryptedSelect all the data from the Hello1 and Hello2 tables where the Message is equal to Welcome. The Message in Hello2 is the same as Hello1 even though Hello2 is encrypted.
13* select * from Hello1 where Message = 'Welcome' Name Message
Sam Welcome
14* select * from Hello2 where Message = 'Welcome' Name Message
Sam Welcome
Show All Properties of Two Tables, Hello2 EncryptedShow all properties of the Hello1 and Hello2 tables using the display table command with the option all. Note that the Hello1 table is shown as Table # 5 by the display table all command and that the Hello2 table is shown as Table In Empress, all tables are stored as files named nnnn.rel, so the Hello1 table would be a file in the database named 0005.rel and the Hello2 table would be a file named 0006.rel.
15* display table Hello1 all *** Table: Hello1 ***
Attributes: Name character(10,1) Message
Creator: srdjan Indices: UNIQUE BTREE Hello1x ON (Message) Lock Level: RECORD
Table #: 5 Records: 3 Record size: 26
16* display table Hello2 all *** Table: Hello2 ***
Attributes: Name character(10,1) Message Encrypted
Creator: srdjan Indices: UNIQUE BTREE Hello2x ON (Message) Lock Level: RECORD
Table #: 6 Records: 3 Record size: 27
Verify that the Index Data is EncryptedUse the operating system escape ! character in Empress SQL to do a folder listing on testdb.
17* ! DIR testdb
2010/01/22 1,678 0001.rel 2010/01/22 3,072 00010001.ix 2010/01/22 10,240 00010005.dtf 2010/01/22 2,206 0002.rel 2010/01/22 3,072 00020001.ix 2010/01/22 1,374 00020008.dtf 2010/01/22 1,024 00020009.dtf 2010/01/22 1,024 00020010.dtf 2010/01/22 1,024 00020011.dtf 2010/01/22 1,024 00020012.dtf 2010/01/22 1,024 00020013.dtf 2010/01/22 1,024 00020016.dtf 2010/01/22 1,024 00020017.dtf 2010/01/22 8,908 0003.rel 2010/01/22 3,072 00030001.ix 2010/01/22 1,120 00030001.ixl 2010/01/22 1,024 00030013.dtf 2010/01/22 1,024 00030014.dtf 2010/01/22 1,648 0004.rel 2010/01/22 3,072 00040001.ix 2010/01/22 15:53 1,024 00040001.ixl 2010/01/22 15:59 3,072 00040002.ix 2010/01/22 15:53 1,024 00040002.ixl 2010/01/22 16:01 1,102 0005.rel 2010/01/22 16:01 3,072 00050001.ix 2010/01/22 16:01 1,105 0006.rel 2010/01/22 3,072 00060001.ix 2010/01/22 15,684 2010/01/22 48 dd_cache 2010/01/22 1,210 tabzero.txt 2010/01/22 < DIR> _lock 2010/01/22 < DIR> _trn
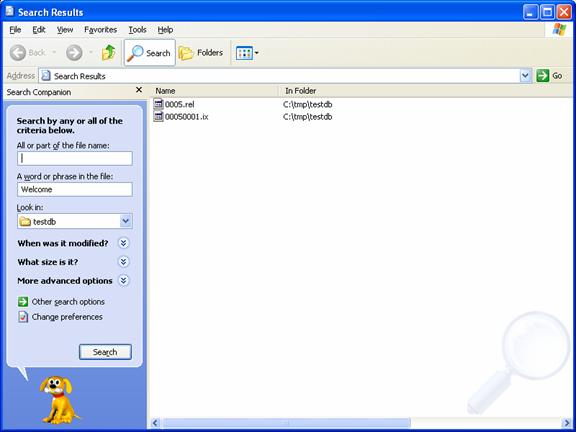
Use the escape character to search for the word Welcome. Since Hello1 is not encrypted on Message, we would expect search to find the word Welcome in the data file, 0005.rel, and the index file, 00050001.ix. Since Hello2 is encrypted on Message, we would expect that search will not find the word Welcome in the data file, 0006.rel or the index file 00060001.ix.
To search for the word Welcome the Search facility in Windows environment after invoking Start button. Supply the following input:
Search by any or all of the criteria bellow
A word or phrase in the file: Welcome
Look in: testdb
And this indeed is what happens. The following image displays the Search Results for the defined query.
All the SQL commands, other than the initial create table to specify which field is encrypted are exactly the same for both encrypted table and the non-encrypted table. The output of the select commands is also identical. The difference of the time to do the select commands between the encrypted table and the non-encrypted table is negligible.
Appendix 1: A List of Commands Used in This Technical NoteThe following may be cut and pasted to repeat the examples. You will need to change the database path location to suit your computer login. You may want to change the database name and the 16-digit hexadecimal encryption key as well.
C: CD \tmp SET MSCIPHERKEYINFO=" C:\tmp\testdb:74657374696e6731 echo %MSCIPHERKEYINFO% empmkdb -cipher MS-AES256 testdb empsql testdb create table Hello1 (Name character (10), Message character (15)) create table Hello2 (Name character (10), Message character (15) encrypted) insert into Hello1 values (" Alex" , " Hello World" ) insert into Hello1 values (" Tom" , " Good Day" ) insert into Hello1 values (" Sam" , " Welcome" ) insert into Hello2 values (" Alex" , " Hello World" ) insert into Hello2 values (" Tom" , " Good Day" ) insert into Hello2 values (" Sam" , " Welcome" ) create unique index Hello1x on Hello1 (Message) create unique index Hello2x on Hello2 (Message) select * from Hello1 select * from Hello2 select * from Hello1 where Message = " Welcome" select * from Hello2 where Message = " Welcome" display table Hello1 all display table Hello2 all ! DIR testdb
Empress Software Inc. www.empress.com
|
|
Company |
Products |
Services |
Partners |
Media |
|
|
USA: 301-220-1919 Canada
& International: 905-513-8888 |
|||||